
Ford OHV engine reassembly - is a part of Ford repair manuals: Ford OHV Engines. This part contains the detailed description and diagrams for Ford OHV engine reassembly.
- With everything clean, commence reassembly by oiling the bores for the cam followers and inserting them fully in their original sequence.
- Lubricate the camshaft bearings and insert the camshaft from the timing cover end of Ford OHV engine.
- Fit the thrust plate and tighten the fixing bolts to the specified torque. The endfloat will already have been checked.
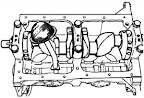
- Wipe clean the main bearing shell seats in the crankcase and fit the shells, noting that the lower shells do not have the lubrication groove. Using a little grease, stick the semicircular thrustwashers on either side of the centre bearing so that the oil grooves are visible when the washers are installed.
 - Check that the Woodruff key is in position on the front end of the crankshaft and tap the crankshaft sprocket into place using a piece of tubing.
- Oil the bearing shells and lower the crankshaft into the crankcase.
- Wipe the seats in the main bearing caps and fit the bearing shells into them. Install the caps so that their markings are correctly positioned.
- Screw in the cap bolts and tighten evenly to the specified torque.
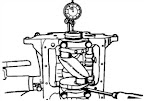
- Now check the crankshaft endfloat. Ideally a dial gauge should be used, but feeler blades are an alternative if inserted between the face of the thrustwasher and the machined surface of the crankshaft balance weight after having prised the crankshaft first in one direction and then the other. Provided the thrustwashers at the centre bearing have been renewed, the endfloat should be with the specified tolerance. If it is not, oversize thrustwashers are available.
 - Rotate the crankshaft so that the timing mark on its sprocket is directly in line with the centre of the crankshaft sprocket mounting flange.
- Engage the camshaft sprocket within the timing chain and then engage the chain around the teeth of the crankshaft sprocket. Push the camshaft sprocket onto its mounting flange. The camshaft sprocket bolt holes should now be in alignment with the tapped holes in the camshaft flange and both sprocket timing marks in alignment. Turn the camshaft as necessary to achieve this, also withdraw the camshaft sprocket and reposition it within the loop of the chain. This is a "trial and error" operation which must be continued until exact alignment of bolt holes and timing marks is achieved.
- Screw in the sprocket bolts to the specified torque and bend up the tabs of a new lockplate.
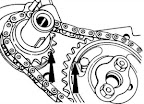 - Bolt the timing chain tensioner into position, retract the tensioner cam spring and then slide the tensioner arm onto its pivot pin. Release the cam tensioner so that it bears upon the arm.
- Fit the oil slinger to the front of the crankshaft sprocket so that its convex side is against the sprocket.
- Bolt the timing chain tensioner into position, retract the tensioner cam spring and then slide the tensioner arm onto its pivot pin. Release the cam tensioner so that it bears upon the arm.
- Fit the oil slinger to the front of the crankshaft sprocket so that its convex side is against the sprocket.
- Using a new gasket, fit the timing cover which will already have been fitted with a new oil seal. One fixing bolt should be left out at this stage as it also holds the coolant pump. Grease the oil seal lips and fit the crankshaft pulley. Tighten the pulley bolt to the specified torque.
- Using a new gasket, bolt the crankshaft rear oil seal retainer into position. Tighten the bolts to the specified torque.
- Locate the engine adapter (back) plate on its dowels and then fit the flywheel.
- Screw in and tighten the flywheel bolts to the specified torque. To prevent the flywheel turning, the starter ring gear can be jammed or a piece of wood placed between a crankshaft balance weight and the inside of the crankcase.
- Install and centralise the clutch.
- The pistons/connecting rods should now be installed. Check to ensure that with the piston crown arrow pointing to the timing cover end of the engine, the oil hole in the connecting rod is on the left as shown. Oil the cylinder bores.
- Install the pistons/connecting rods.
- Fit the sump.
 - Fit the oil pressure sender unit.
- Turn the crankshaft until No 1 piston is at TDC (crankshaft pulley and timing cover marks aligned) and fit the oil pump complete with new gasket and a new oil filter.
- Using a new gasket, fit the fuel pump. If the insulating block became detached from the crankcase during removal, make sure that a new gasket is fitted to each side of the block.
- Fit the coolant pump using a new gasket.
- Fit the cylinder head.
- Refit the pushrods in their original sequence, and the rocker shaft.
- Adjust the valve clearances and refit the rocker cover using a new gasket.
- Fit the inlet and exhaust manifolds using new gaskets and tightening the nuts and bolts to the specified torque.
- Refit the carburettor using a new flange gasket and connect the fuel pipe from the pump.
- Screw in the spark plugs and the coolant temperature switch.
- Refit the thermostat and the thermostat housing cover.
- Fit the pulley to the coolant pump pulley flange.
- Fit the alternator and the drivebelt and tension the belt.
- Refit the distributor.
- Refit the distributor cap and reconnect the spark plug HT leads.
- Bolt on and connect the coolant pipe to the side of the cylinder block.
- Fit the breather pipe from the oil filler cap to the inlet manifold and fit the cap.
- Check the sump drain plug for tightness. A new seal should be fitted at regular intervals to prevent leakage. Refit the dipstick.
- Refilling with oil should be left until the engine is installed in the vehicle.
from Ford repair manuals