Ford carburettor Weber 2V dismantling and reassembly - is a part of Ford repair manuals: Fuel and exhaust syatems. This part contains the detailed description of dismantling and reassembly carburettor works and all necessary diagrams for Ford carburettor Weber 2V.
Ford carburettor Weber 2V removal and refitting:
- check the cost and availability of spare parts before deciding to dismantle the carburettor;
- if the unit has seen much service, fitting a new or reconditioned carburettor may prove more satisfactory than any attempt at overhaul;
- obtain a carburettor repair kit, which will contain the necessary gaskets, diaphragms and other renewable items;
Exploded view of Ford carburettor Weber 2V:
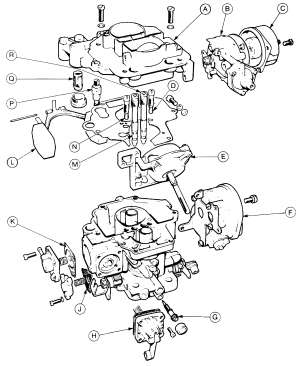 A - top cover;
B - choke lever housing;
C - choke bi-metal housing;
D - secondary idle jet;
E - secondary throttle vacuum unit;
F - stepper motor;
G - idle mixture adjustment screw;
H - accelerator pump diaphragm;
J - power valve diaphragm;
K - low vacuum enrichment diaphragm;
L - float;
M - primary emulsion tube;
N - primary idle jet;
P - needle valve;
Q - fuel inlet filter;
R - secondary emulsion tube.
- with the carburettor removed from the vehicle, clean it thoroughly externally and place it on a clean worksurface;
- referring to the exploded view of the carburettor, remove each component part whilst making a note of its fitted position;
- make alignment marks on linkages etc.;
- reassemble in the reverse order to dismantling, using new gaskets, O-rings etc.; be careful not to kink the diaphragms;
Ford carburettor Weber 2V float level adjustment:
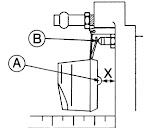 A - rib on float;
B - adjusting tag;
X - level measurement.
- check the float level as follows; hold the top cover vertically so that the needle valve is closed by the float; measure the dimension from the gasket face of the cover (with the gasket fitted) to the top rib on the float; the correct value is given in the specifications; correct if necessary by bending the tag on the float arm;
- for adjustment of the automatic choke, refer to Ford carburettor Weber 2V automatic choke adjustment.
Ford carburettor Weber 2V automatic choke adjustment:
- disconnect the battery negative lead;
- remove the air cleaner;
- disconnect the feed wire from the choke bi-metal housing;
- make alignment marks if necessary, then remove the three screws which secure the bi- metal housing; detach the housing and recover the heat shield;
Ford carburettor Weber 2V choke vacuum pull-down check:
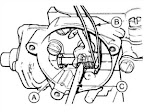 A - pull-down diaphragm rod;
B - rubber band;
C - screwdriver.
- fit a rubber band over the choke valve lever and tension the rubber band to hold the choke valve closed;
- using a small screwdriver, press the vacuum pull-down rod into the pull-down housing as far as it will go;
- hold the rod in this position and use a drill shank or similar item to measure the clearance between the choke valve and the wall of the primary venturi;
- measure the clearance on the down side of the valve; The desired pull-down clearance is given in the specifications;
- if adjustment is necessary, remove the end plug from the pull-down diaphragm cover;
- turn the adjusting screw located under the plug;
Ford carburettor Weber 2V adjusting the vacuum pull-down:
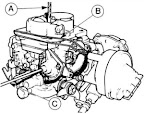 A - twist drill;
B - rubber band;
C - screwdriver.
- refit the plug when adjustment is correct;
- remove the drill and the rubber band;
- refit the heat shield, making sure it is properly located;
- refit the bi-metal housing, engaging the end of the spring with the choke valve lever;
- fit the three screws, position the housing in its original alignment and tighten the screws;
Ford carburettor Weber 2V bi-metal housing alignment marks:
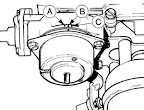 A - rich;
B - index;
C - lean.
- if the bi-metal housing alignment has been lost, refer to the specifications;
- small deviations from the specified setting may be made to correct over or under-choking;
- reconnect the choke feed wire, refit the air cleaner and reconnect the battery;
- check the idle mixture adjustment.
Read more: Ford carburettor diagrams
from Ford repair manuals
