
Ford carburettor Weber 2V TLD needle valve and float removal, refitting and adjustment - is a part of Ford repair manuals: Fuel and exhaust syatems. This part contains the detailed description of needle valve and float removal, refitting and adjustment works and all necessary diagrams for Ford carburettor Weber 2V TLD.
Ford carburettor Weber 2V TLD needle valve and float removal, refitting and adjustment:
- disconnect the battery negative lead;
- remove the air cleaner;
- thoroughly clean all external dirt from the carburettor;
Ford carburettor Weber 2V TLD float and needle valve locations in carburettor top cover:
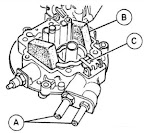 A - fuel hose connections;
B - float;
C - needle valve.
- disconnect the fuel supply and return hoses from the carburettor, noting their locations to aid refitting, and plug their ends to minimise petrol spillage;
- disconnect the wiring from the automatic choke;
- disconnect the wiring from the anti-dieselling (anti-run-on) valve;
- remove the four Torx screws securing the carburettor to the inlet manifold;
- remove the two securing screws, and lift off the carburettor top cover, leaving the carburettor main body in place on the inlet manifold;
- slide the float retaining pin from the carburettor top cover, tapping it gently if necessary, then lift out the float and needle valve;
- if desired, the needle valve housing can be unscrewed from the top cover;
- recover the washer and discard it; a new one must be fitted on reassembly;
- inspect the components for damage, and renew as necessary;
- check the needle valve for wear, and check the float assembly for leaks by shaking it to see if it contains petrol;
Ford carburettor Weber 2V TLD float level adjustment:
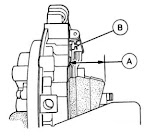 A - check dimension;
B - adjustment tag.
- refitting is a reversal of removal, bearing in mind the following points: use a new washer when refitting the needle valve housing; when refitting the float and needle valve, ensure that the tag on the float locates under the spring clip on the needle valve; check that the float and needle valve operate smoothly; check and, if necessary, adjust the float level as described below; ensure that the carburettor mating surfaces are clean then fit a new gasket onto the main body and refit the carburettor top cover; i the fuel hoses were originally secured with crimped clips, discard these and secure the hoses in position with new worm drive hose clips; on completion, check and if necessary adjust the idle speed and mixture;
- with the carburettor top cover removed as described above, proceed as follows;
- fit a new gasket to the top cover, then hold the carburettor top cover in a vertical position, with the needle valve uppermost and shut;
- measure the distance between the top cover gasket and the bottom of the float;
- if the distance is not as specified, adjust by bending the tag on the float assembly;
- refit the carburettor top cover by reversing the removal operations.
Read more: Ford carburettor diagrams
from Ford repair manuals