
Ford Aerostar cylinder heads removal and installation - is a part of Ford Aerostar repair manuals: Engines. This part contains the detailed description and diagrams for Ford Aerostar with 2.3l, 2.9l, 3.0l and 4.0l engines.
Ford Aerostar cylinder heads removal:
Disconnect negative battery cable and move out of the way. Drain cooling system. Refer to Ford Aerostar repair manuals: Engine Cooling. Remove clean air flex tube from throttle body and air cleaner. Refer to Ford Aerostar repair manuals: Air Intake. Remove engine oil filler adapter. Disconnect fuel lines as outlined in Ford Aerostar repair manuals: Fuel Charging and Controls.
Mark vacuum line location and remove lines. Disconnect upper radiator and heater hoses and move out of the way. Disconnect ignition coil electrical connector.
 Remove throttle body as outlined in Ford Aerostar repair manuals: Fuel Charging and Controls. Mark distributor housing to block and note rotor position. Remove ignition wires from spark plugs and locating studs. Remove distributor. If left cylinder head is being removed, perform the following: - remove accessory drive belt; - remove three power steering pump bracket attaching bolts and one nut: remove pump, bracket and lines as an assembly: place assembly aside in a position to prevent fluid leakage; - remove ignition coil and bracket; - remove engine oil dipstick tube attaching nut from exhaust manifold stud; rotate or remove tube from manifold; - remove fuel line retaining bracket bolt from front of cylinder head. If right cylinder head is being removed, perform the following: - remove accessory drive belt; - disconnect alternator electrical harnesses; - remove three belt tensioner bolts and remove assembly from vehicle; - remove three alternator bracket and adjusting arm retaining bolts; remove alternator / bracket assembly from vehicle; - remove closure hose from rocker arm cover oil fill adapter. Remove spark plugs. Remove exhaust inlet pipe(s) and exhaust manifold(s). Remove rocker arm covers as outlined. Loosen rocker arm fulcrum retaining bolts enough to allow the rocker arm to be lifted off the push rod and rotated to one side. Remove push rods. Identify the position of each rod. The push rods should be installed in their original position during re-assembly. Remove intake manifold as outlined in this section. Remove cylinder head retaining bolts. Remove cylinder head(s). Remove old cylinder head gasket(s) and discard.
Ford Aerostar cylinder heads installation:
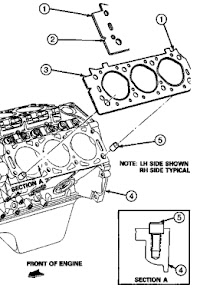
Lay a clean shop rag in lifter valley to catch any gasket particles. Clean cylinder head, intake manifold and cylinder head to block gasket surfaces. After scraping, lift cloth so no gasket material falls into lifter holes. If the cylinder head was removed for a cylinder head gasket replacement, check the flatness of the cylinder head and block gasket surfaces. Refer to Ford Aerostar repair manuals: Engine Service, Gasoline.
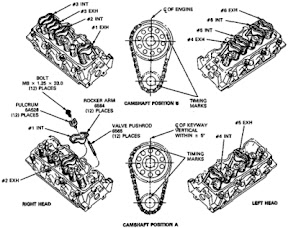
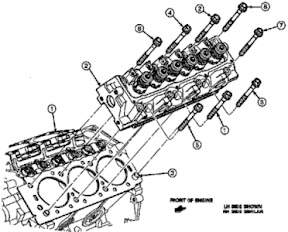 Position new head gasket(s) on cylinder block using the dowels for alignment. Make sure gasket is aligned as shown in the illustration. Carefully position cylinder head(s) on block. Install new cylinder head retaining bolts and hand tighten. Tighten retaining bolts in sequence as illustrated to 80 N-m (59 ft-lb). Back off all bolts a minimum of one full turn (360 degrees). Re-tighten the cylinder head retaining bolts in sequence in two tightening steps as follows: - 50 N-m (37 ft-lb); - 92 N-m (68 ft-lb). Install intake manifold as outlined. Completely coat distributor gear teeth with ESP-M2C154-A or equivalent heavy-weight gear lube. Install distributor and align to premarked location on cylinder block and rotor position. Install retaining bolt and washer and hand-snug. Connect ignition wires to spark plugs. Dip each push rod in Oil Conditioner D9AZ-19579-CA (ESR-M99C80-A) or equivalent heavy engine oil. Install push rods in their original position. Rotate camshaft to position A as shown. Install rocker arms, fulcrums and retaining bolts in locations specified in camshaft position A. Tighten bolts to 11 N-m (8 ft-lb) to seat fulcrums in cylinder head. Rotate crankshaft 120 degrees to position B. Install rocker arms, fulcrums and retaining bolts in locations specified in camshaft position B. Tighten bolts to 11 N-m (8 ft-lb). Final-tighten retaining bolts to 32 N-m (24 ft-lb) with camshaft in any position. Apply Oil Conditioner D9AZ-19579-CA (ESR-M99C80-A) to all rocker arm assemblies. Install exhaust manifold(s) as outlined.
 Tighten retaining bolts to 25 N-m (18 ft-lb). Install inlet pipe retaining nuts. Tighten to 41 N-m (30 ft-lb). Install dipstick tube into cylinder block as illustrated. Tighten retaining nut to 18 N-m (13 ft-lb). Install spark plugs. Tighten to 11 N-m (8 ft-lb). Install rocker arm covers as outlined. Install fuel injector electrical harness to injectors and inboard rocker arm cover studs. Connect engine harness to main harness and secure with retaining features. Install throttle body and new gasket as outlined. Refer to Ford Aerostar repair manuals: Fuel Charging and Controls. Install ignition coil and bracket. Tighten retaining nuts to 18 N-m (13 ft-lb). Connect electrical connection to coil. If left cylinder head was removed, perform the following: - install fuel line retaining bracket to front of cylinder head. Tighten retaining bolt to 35 N-m (26 ft-lb); - install ignition coil and bracket. Tighten retaining bolts to 48 N-m (35 ft-lb); - install power steering pump and bracket assembly. Tighten three retaining bolts and one nut to 51 N-m (38 ft-lb); - install accessory drive belt. Refer to Ford Aerostar repair manuals: Accessory Drive for routing and tension specifications. If right cylinder head was removed, perform the following: - install closure hose from rocker arm cover oil fill adapter to air cleaner; - install alternator and bracket assembly. Tighten 3 retaining bolts to 48 N-m (35 ft-lb); - install accessory drive belt. Refer to Ford Aerostar repair manuals: Accessory Drive, for routing and tension specifications; - connect alternator electrical harness. Connect fuel lines to fuel supply rail as outlined in Ford Aerostar repair manuals: Fuel Charging and Controls, 3.0L. Install fuel line safety clips. Connect upper radiator and heater hoses. Tighten clamps securely. Refer to Ford Aerostar repair manuals: Engine Cooling. Connect vacuum lines to premarked locations. Install engine oil filler adapter. Drain and change engine oil. Install clean air flex tube to throttle body and air cleaner. Tighten clamps securely. Refer to ord Aerostar repair manuals: Air Intake. Fill and bleed cooling system. Connect negative battery cable. Start engine and check for coolant, fuel, oil, vacuum and exhaust leaks. Verify base ignition timing as outlined. Check and, if necessary, adjust speed control linkage.
from Ford Aerostar repair manuals