Ford automatic transmission A4LD disassembly - is a part of Ford repair manuals: Manual and Atomatic Transmissions. This part contains the detailed description of disassembly works and all necessary transmission diagrams for Ford Aerostar, Ranger and Explorer automatic transmission A4LD.
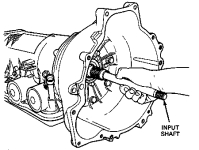
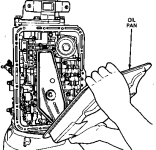
Remove torque converter (the torque converter is heavy; Be sure to have a good hold on it when removing it from the transmission.). Remove input shaft (the two splined ends are different). Remove eighteen 13 mm bolts, then remove oil pan. Remove 10 mm bolt (M6 x 45 mm long) then remove filter screen.
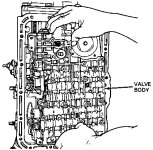
Remove detent spring. Disconnect two wires at converter clutch solenoid. Disconnect the two wires at the 3-4 shift solenoid. Remove twenty-five 10mm bolts retaining valve body to case. While easing valve body out of the transmission, unlock and remove selector lever connecting link. Remove valve body and gasket (there are four different lengths of bolts - 30 mm, 35 mm, 40 mm and 45 mm.). Remove 5 mm Allen-head retaining bolt holding center support.
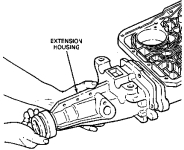
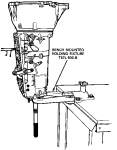
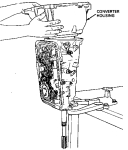
Remove six 17 mm bolts and studs, then remove extension housing. Remove the parking pawl and the return spring. Remove two 10mm bolts, then remove governor. Mount transmission in Bench Mounted Holding Fixture T57L-500-B or equivalent as shown. Two 10 mm bolts, 50 mm long will be required. Remove eight 17 mm bolts, then remove converter housing and pump as an assembly. Rotate and lift so that clutches will stay in place. Remove the No. 1 thrust washer and the gasket. Remove hydraulic pump oil seal using Seal Remover T74P-77248-A or equivalent. Remove the hydraulic pump from the converter housing and remove the steel plate (behind oil seal) with the O-ring.
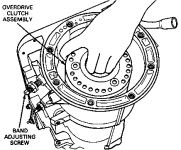
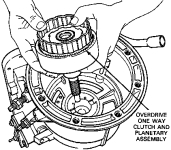
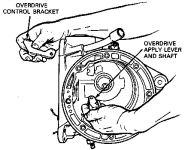
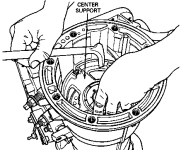
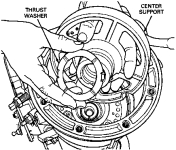
Loosen overdrive band lock nut and back off adjusting screw. Locknut will be discarded and a new nut will be used, as locknut and seal are one piece. Remove anchor and apply struts. Lift out overdrive clutch assembly and band (identify band as "overdrive" and identify either "apply" or "anchor" end for reinstallation in order to distinguish it from the intermediate band; 4.0L applications use a single wrap design band.). Lift out overdrive one-way clutch and planetary assembly.Remove center support retaining snap ring. Remove overdrive apply lever and shaft. Remove overdrive control bracket from valve body side of case (the overdrive apply lever does not have a boss on the shaft hole as compared to the intermediate apply lever; the overdrive apply lever shaft is longer as compared to the intermediate apply lever shaft.). Remove thrust washer on top of center support (identify thrust washer for reassembly.). Remove center support being careful to pry upward evenly.
Remove thrust washer below center support (identify thrust washer for reassembly.). Loosen intermediate band locknut and back off adjusting screw. Locknut will be discarded. Turn transmission in holder, down 90 degrees. Remove anchor and apply struts. Remove reverse/high and forward clutch assembly. Remove intermediate band (identify band as "intermediate" and identify which end is "apply" or "anchor" side for reinstallation purposes.). Remove forward planet assembly. Depending on application, some vehicles will have transmissions with aluminum planet carrier assemblies and some will have stamped steel planet carrier assemblies. Note and identify No. 6 thrust washer or thrust bearing. Remove sun gear shell. For all applications except 4.0L, remove large snap ring from reverse planet gear carrier (transmissions used with 4.0L engines do not use a snap ring at this location.).
Remove reverse planet assembly. Note and identify thrust washers on both sides. They are identical. With 4.0L applications, remove output shaft sleeve (lubricant guide). Remove small snap ring on output shaft. Remove output shaft ring gear. Remove low-reverse drum and one-way clutch assembly. Remove low-reverse servo from valve body side of case. Remove low-reverse band. Remove thrust washer (inner race of rear one-way clutch is not removable from case. On 4.0L applications, neither is the reverse drum-to-case thrust washer.). Remove intermediate apply lever and shaft (the intermediate apply lever has a boss on the shaft hole and the shaft is shorter than the overdrive shaft; a control bracket is not used.). Turn transmission so that output shaft points upward. Remove output shaft by pulling upward (if output shaft is to be replaced, 4.0L applications use an output shaft that does not have a lubricant hole.). Remove park gear / collector body assembly from rear of case. Remove thrust washer. Remove one 10 mm (M6 x 12 mm long) bolt and retainer. Remove vacuum diaphragm and throttle valve actuator rod. Verify that the throttle valve moves freely using flat needlenose pliers. Remove throttle valve, using needlenose pliers. Remove intermediate servo cover, piston and spring. Remove overdrive servo cover snap ring. Remove overdrive servo cover, piston and spring.
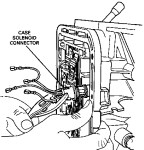
Covers usually can be removed by tapping lightly on cover or side of case. Occasionally, covers must be removed using air pressure. Air pressure may be used on release sides of pistons. Identify the overdrive cover and piston from the intermediate cover and piston. Keep separate or tag for proper installation. Installation in the incorrect bore could cause band concerns due to pressure differences. Air pressure should not be greater than 137 kPa. Remove neutral start switch using Neutral Start Switch Socket T74P-77247-A or equivalent. Do not use an open-end wrench. Damage to neutral start switch can result. Remove 13 mm kickdown lever nut, lever and O-ring seal. Remove linkage centering pin, taking care not to damage case flange. Remove 7/8-inch nut, manual lever, internal kickdown lever and park pawl rod and detent plate assembly. Remove lever shaft oil seal. Remove case solenoid connector. A tab on the outside of the case on backside of connector must be depressed while pulling with pliers. The tab is depressed with a small pair of locking pliers (the connector need not be removed unless it is to be replaced, and/or if the case is to be immersed in a degreaser).
from Ford repair manuals